How to reset Windows 10 without reinstalling and losing data

How to reset Windows 10 without reinstalling and losing data

Reinstall is a word that we often hear when a PC or laptop has an error and cannot find a solution to fix it. The only way left is to reinstall, but this also means that applications and data will be lost.


Is there any other solution besides reinstalling and deleting data? Of course there is, we can reset Windows 10 without reinstalling it. The data on Drive C will not be lost, but the application still has to be installed again after Windows has been reset.


Please follow the steps below.


How to reset Windows 10


1. Enter the Settings menu


The first step is to open your Windows 10 Settings menu, how to click the Start button then click on the gear icon (Settings).


Figure 01 how to reset Windows 10 without reinstalling and removing data


2. Select the Update & Security menu


After entering the Settings menu, click on the Update & Security menu at the bottom.
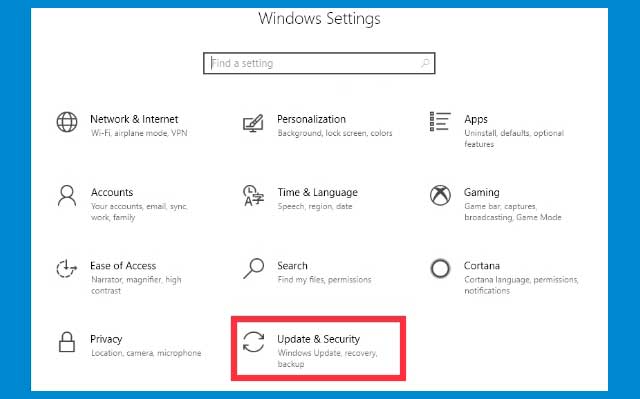

Figure 2 how to reset Windows 10 without reinstalling and removing data


3. Select the Recovery menu


Note on the left tab panel, then click on the Recovery menu.


4. Click the Get started button


On the right panel, you will be presented with three options, namely Reset this PC, Go back to an earlier build, and Advanced startup. To do a reset, click the Get started button in the Reset this PC section.


Figure 3 how to reset Windows 10 without reinstalling and removing data


5. Select Keep my files


A new window will appear and you will be given two choices. First, Keep my files, this option will reset the PC, but the data in the Download, Music, Video, Document, and other data on drive C will not be lost.


The second option is Remove everything, if you choose this then all data will be deleted just like the first time you installed Windows 10.


Select by clicking one time the option Keep my files so that your data is not lost.
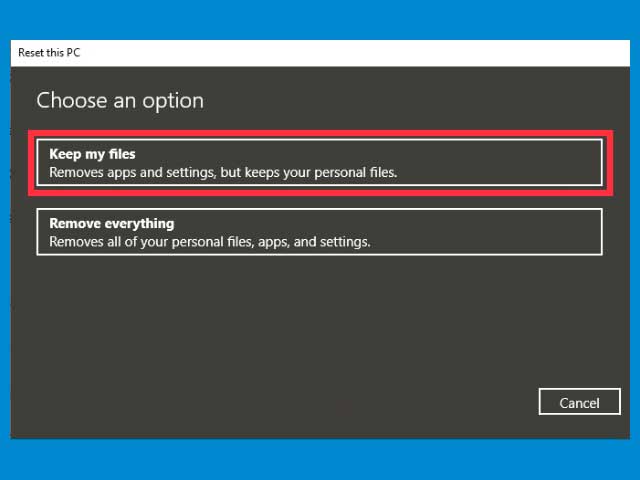

Figure 4 how to reset Windows 10 without reinstalling and removing data


6. Click Next


Then click the Next button.


7. Click the Reset button


A reset window will appear with the information Ready to reset this PC, at the bottom there is a Reset button, click on the button.
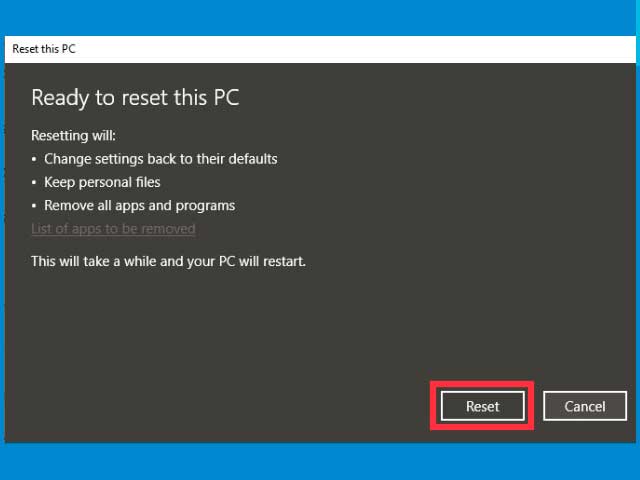

Figure 5 how to reset Windows 10 without reinstalling and removing data


8. Wait until the reset process is complete


Windows will restart and the reset process automatically, you just have to wait for it to finish.


9. Click the Continue button


After the reset is complete, a window will appear to enter Windows 10, the Troubleshoot menu, and turn off the PC. Click on the Continue button to enter Windows 10 again.


Figure 6 how to reset Windows 10 without reinstalling and removing data


10. Reinstall the required applications


At this point, you have successfully reset Windows 10, the final step is to reinstall the applications you need.


How to reset Windows 10 via the Sign in menu


In some cases, your Windows 10 may have a problem so you can't access the Settings menu. This can happen because a virus from the flash enters the computer, or because there is a corrupt system file.


To reset you can use other methods, namely by entering via the Sign in menu or Login screen.


The steps:


Press Windows key + L on the keyboard, you will be taken to the Login page.


Notice at the bottom right of the screen, there is a power button. Hold down the Shift key on the keyboard then click the Power button> select Restart.


Figure 9 how to reset Windows 10 without reinstalling and removing data


Windows 10 will restart and enter the Windows Recovery Environment (WinRE) menu.


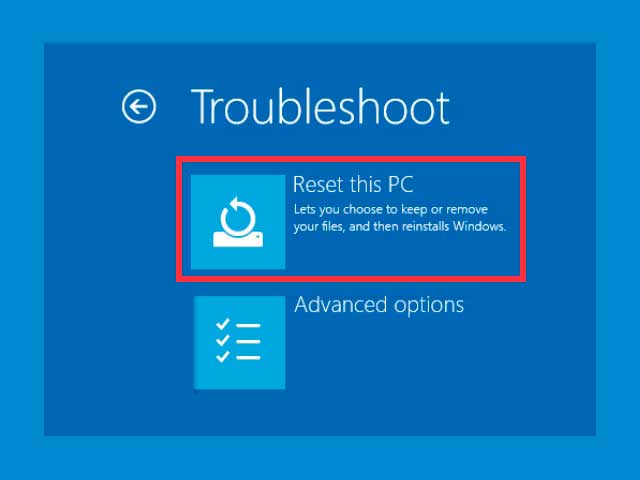
Then the Choose an option window will appear, click on the Troubleshoot option.


Figure 7 how to reset Windows 10 without reinstalling and removing data


Then select Reset this PC.


Figure 8 how to reset Windows 10 without reinstalling and removing data


The rest of the steps are the same as the ones described above.


By resetting the error you may experience will disappear, this method is powerful enough without the need to delete existing data.


How to reset Windows 10 if you can't get to the desktop


If the problem with your Windows 10 is severe enough, it could be preventing it from logging on to the desktop. It could be because of a blue screen, a blank black screen, the loading process stops at the Windows logo, and other similar problems.


If you've created a restore point before, you can use it to restore Windows 10 to the state it was in before the problem occurred. But if it's not there, then resetting the PC can be a solution.


But because you can't enter the desktop, this also causes us not to be able to access the reset menu.


The fix is ​​to take advantage of the WinRE feature, from here we can reset Windows 10. But the first thing to do is to go to the WinRE page first.


First enter the Windows Recovery Environment or WinRE by doing the following steps:


  1. Turn on the computer then press and hold the power button for 5-10 seconds to turn off the computer.
  2. Press the power button again to turn on the computer.
  3. After the computer turns on, press the power button again and hold it for 5-10 seconds until the computer turns off.
  4. Press the power button again to turn on the computer.
  5. After the computer starts, press the power button again and hold it for 5-10 seconds to turn off the computer.
  6. Press the power button again to turn on the computer.
  7. Wait for Windows to enter the WinRE page


After the WinRE page appears, select it on the Troubleshoot menu.


Figure 7 how to reset Windows 10 without reinstalling and removing data


Then select Reset this PC.


Figure 8 how to reset Windows 10 without reinstalling and removing data


Follow the same steps as described above until the reset process is complete.


Read more »
Fix api-ms-win-crt-runtime-l1-1-0.dll is missing

Fix api-ms-win-crt-runtime-l1-1-0.dll is missing

When we run and install certain applications or games an error reads "The program can't start because api-ms-win-crt-runtime-l1-1-0.dll is missing from your computer. Try reinstalling the program to fix this problem ” it might arise.


This problem can happen to users of Windows 7, Windows 8, and Windows 10. What is the cause and how to solve it?


The cause of the api-ms-win-crt-runtime-l1-1-0.dll error is missing


The cause of this error appears is the loss of a file called api-ms-win-crt-runtime-l1-1-0.dll because it is deleted or the file is damaged. The location of the api-ms-win-crt-runtime-l1-1-0.dll file is in the Microsoft Visual C ++ Redistributable for Visual Studio 2015 program.


So every time you run an application or game that requires Microsoft Visual C ++ Redistributable for Visual Studio 2015 to run, this error will appear because the api-ms-win-crt-runtime-l1-1-0.dll file is not found or not function.


For example, when playing GTA 5 or PES 2013 games, this error often appears because without realizing it, the api-ms-win-crt-runtime-l1-1-0.dll file is damaged or no longer works on our computers.


To overcome this, the main idea is to repair the damaged file or replace it with a new one. Below are some of the ways you can try to do this.


How to solve api-ms-win-crt-runtime-l1-1-0.dll is missing from your computer


1. Update Windows

The Visual C ++ Redistributable for Visual Studio 2015 program is part of an updated version of Windows. So to fix it automatically, we just need to update Windows.


Windows 10:


  1. Click on the Start button
  2. Select Settings
  3. Select the Update & Security menu
  4. Click on the Windows Updates tab
  5. Click on the Check for updates button
  6. Wait until the download and install process is complete
  7. Restart your computer


Windows 8:


  1. Hover over the right corner of the screen to access the Charm bar
  2. Click on the Settings menu
  3. Click again on the Change PC Settings menu
  4. Select the Update & Recovery menu
  5. Select the Windows Update option
  6. Click on the Check now button
  7. Wait for the download and install process to complete
  8. Finally restart your computer


Windows 7:


  1. Click the Start button
  2. Select the All Programs menu
  3. Click on the Windows Update option
  4. Click on the Install Updates button
  5. Wait until the download and install process is complete
  6. Finally restart your computer


After performing the steps above and the computer is back on, try again to run the problematic application or game again and see if the api-ms-win-crt-runtime-l1-1-0.dll is missing error has been successfully resolved .


2. Download the Visual C ++ Redistributable directly from the Microsoft website


If the first method hasn't worked or for some reason you can't update Windows, then the next solution is to download the C ++ Redistributable program directly from the Microsoft website.


The idea is to reinstall the program so that the damaged or missing api-ms-win-crt-runtime-l1-1-0.dll file can be replaced with a new one. This method is more likely to work than just updating.


Follow these steps:


  1. Make sure your laptop or PC is connected to the internet
  2. Open a browser application
  3. Go to the following Microsoft web page: Download
  4. Click the Download button


    overcoming api ms win crt runtime l1 1 0.dll is missing 1

  5. Select the appropriate Windows architecture according to whether you are using 32-bit or 64-bit
  6. Click the Next button
  7. Wait until the download is complete
  8. After the file has finished downloading, double click to install it
  9. After the install process is complete restart your computer


After the computer turns back on, try again running the application or game that couldn't and see if the error "The program can't start because api-ms-win-crt-runtime-l1-1-0.dll is missing from your computer. Try reinstalling the program to fix this problem ”still appears or has been successfully resolved.


3. Perform Repair and Repair the Visual C ++ Redistributable via the Control Panel


The next solution that you can try to do is to repair the Visual C ++ Redistributable program. On the Windows operating system, there is a Repair feature that we can use to do this. Although this method is not always 100% successful, it is worth trying.


Follow these steps:


  1. Click on the Start button
  2. Type Control Panel
  3. Select the Control Panel program that appears
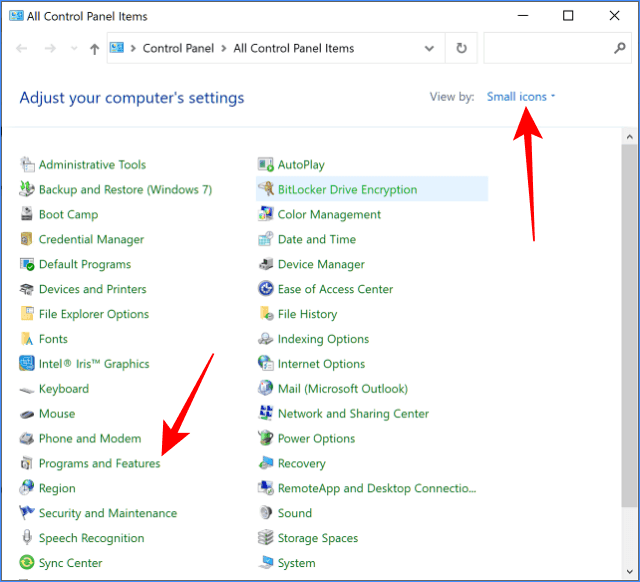
  4. In Control Panel select View by Small icons mode
  5. Then select the Programs and Features menu

    overcoming api ms win crt runtime l1 1 0.dll is missing 2

  6. Right click on the program called Microsoft Visual C ++ 2015 Redistributable
  7. Select Change

    solve api ms win crt runtime l1 1 0.dll is missing 3

  8. Click the Repair button then select Yes

    overcoming api ms win crt runtime l1 1 0.dll is missing 4

  9. Follow the next instructions to complete
  10. Finally, after the repair process is complete, restart your laptop or PC


4. Download the api-ms-win-crt-runtime-l1-1-0.dll file from the internet


The next solution to solve the api-ms-win-crt-runtime-l1-1-0.dll is missing problem is to replace the file with a new file obtained from the internet. There are several dll file database sites that we can use, we just have to find these files to replace the old files.


Follow these steps:


  1. Make sure your PC or laptop is connected to the internet
  2. Open a browser application
  3. Go to the following page: Download
  4.  On this page you will see several versions of the api-ms-win-crt-runtime-l1-1-0.dll file for both 32-bit and 64-bit architectures
  5. Choose the appropriate Windows you are using and then download the file to your computer
  6. The file is still in Zip form, so it must be extracted first with an archive application such as 7zip or Winrar
  7. Next we have to move the resulting file to the location where the api-ms-win-crt-runtime-l1-1-0.dll file is located in C / Windows / system32. Copy and paste the file to that location, if there are questions to overwrite or replace, select Yes.
  8. Restart the computer

5. Run the System Restore Point


Restore Piont is a system backup method that can be used when there are errors that are difficult to fix, including api-ms-win-crt-runtime-l1-1-0.dll is missing from your computer.

To be able to use this feature, you must have previously created a Restore Point, if you haven't, then skip this method.

Follow these steps:

  1. First enter the Control Panel then select the Recovery menu
  2. Then click on Open system Restore then click Next
  3. The System Restore window will open, where you will see a list of Restore Points that have been created
  4. If there are more than one Restore Points, pay attention to the date, select the one with the most recent date
  5. After that, click the Next button

    overcoming api ms win crt runtime l1 1 0.dll is missing 5

  6. Finally click the Finish button

6. Reset the PC


If all of the methods above have been tried but nothing has worked, then the last solution left without having to reinstall is to reset the PC.

This means we will restore Windows to factory settings, such as when you reinstalled or bought a laptop.

Resetting is different from reinstalling because you will be given the option to keep personal data in the user folder from being lost.

Follow the steps in this tutorial to reset your computer:

Read more »
How to Search for words within files on Windows 10

How to Search for words within files on Windows 10

Searching for a particular document containing certain words or phrases by scanning through each file yourself, can be both time consuming and frustrating. Why not save yourself some time by using the search function in Explorer. To search for words within files on Windows 10 follow these instructions:

  1. Open windows explorer
  2. Using the left hand file menu select the folder to search in
  3. Find the search box in the top right hand corner of the explorer window


  4.  In the search box type content: followed by the word or phrase you are searching for.(eg content:yourword)


  5.  To narrow down the search it is best to include a file type (eg .doc, .xls). To do this, add the word file: followed by the file type. (eg file:*.doc)


  6. This will bring up all word documents within that folder that have the word or phrase you are looking for. From here you may select the document that you wish to open.

Read more »
How to speed up Windows 10, 8 / 8.1 and 7

How to speed up Windows 10, 8 / 8.1 and 7

Some tips for improving computer performance so that it doesn't slow down anymore.

1. Uninstall unnecessary programs, applications and software

The more programs or applications installed on your device, it automatically takes up quite a bit of storage space. Moreover, there is an application process running behind the scenes that can absorb the RAM or CPU of your device. For that, you need to uninstall programs that you rarely use or don't use at all. If one day you need it again, you can reinstall it.

2. Kill the process from the application running in the background

This also greatly affects the performance of your device. The more processes that are running in the background, the slower the process performance of your laptop. To be able to see the running processes, you can go to Task Manager> Processes then look in the Bacground Processes section how many processes are running. You can turn off. But here be careful, you have to know the impact of shutting down any process you want. You could even make the device error!


3. Delete unnecessary files and junk files

The more large files you no longer need but are still stored on your laptop, then it's a good idea to delete or just backup online via Google Drive. Moreover, the files are located on Local Disk (C :). Also be diligent in deleting junk files because in the absence of junk files, laptop performance can increase slightly. Just make sure that the files you want to delete are files that are no longer in use.

4. Scan your device with Antivirus

Computer viruses can also be very dangerous for the continued performance of your laptop processor. Use a trusted antivirus, for example Smadav (only for second layer security) or use Windows Defender to root all bad files / systems / programs on your device. Perform regular scans, can be once a week, once ten days or once a month so that your laptop is safe and performance fast.

5. Use CCleaner software

Not a promotion, but seeing its function, I recommend that you use CCleaner software to speed up the performance of your laptop. The function of this application is to automatically clean unnecessary files up to your browser cache-cookies. However, you can manage what files do not need to be deleted. For that, you just use the software immediately. There is available in a free version! My experience after doing the cleaning using CCleaner, the process speed increases very fast!


Actually there are still many tips that you can apply, for example, always updating your Windows Update, restarting it if the laptop has been alive for a long time or moving non-system files from partition C: to another partition, for example D :. Hopefully, after doing these tips and tricks, your laptop's performance can increase drastically.

Read more »
How to find the right hardware drivers for Microsoft Windows 10

How to find the right hardware drivers for Microsoft Windows 10

A driver is a hardware drive program on a computer. A hardware device can only function if we have installed the right drivers.

In Windows 10, almost all drivers will be installed automatically when we update for the first time after a fresh install. Windows will look for data on their servers during the update process, and if there is a suitable driver it will be installed automatically.

However, if there is still a device that cannot function, it means that there is a driver that is not known by Windows, then we must find and install the driver manually. This is because Windows doesn't have a suitable driver for this device on their server so it can't install it automatically during the update process.

List of drivers in Windows 10:

  • Audio inputs and outputs
  • Biometric devices
  • Bluetooth
  • Hard drive / Hard disk
  • Display Adapters (VGA)
  • Firmware
  • Human Interface Device
  • IDE ATA / ATAPI controllers
  • Keyboard
  • Mice and other pointing devices
  • Monitors
  • Network adapters (WiFi, Ethernet, LAN, WAN)
  • Other devices
  • Portable Devices
  • Ports (COM & LPT)
  • Printer
  • Processors
  • Security devices
  • Sound, video and game controllers
  • Storage controllers
  • System devices
  • Universal Serial Bus controllers

To find the right drivers in Windows 10 is not difficult, here is a tutorial on how to download unknown drivers from devices on your computer.

How to find the right driver in Windows 10

1. Enter the Device Manager

The first step you need to do is open the Device Manager. The trick is to right click on the Start button> select Device Manager.

2. Find a device that does not have the driver installed

In the Device Manager you will see a list of devices on the computer. Find which device has no driver installed, usually there will be an indicator in the form of a yellow exclamation mark icon.

Like the following example:


3. Right click on the device

After finding the device that you want to install the driver on, the next step is to right-click on the device.

4. Select Properties

Then select Properties.


5. Copy the device id

After entering the Properties window, click on the Details tab. Then pay attention to the Property section> select Hardware ids> copy the code that appears by right clicking then clicking Copy.


6. Open a driver search site

To find the driver based on the device we need the help of an automatic driver finder website. One pretty good site is driverpack.net, you can use this site.

7. Paste the device id on the site

Open the https://drp.su/en/catalog> paste the hardware id in the search field> enter.

8. Download and install the driver

After the results appear you will see some recommended drivers for the device. Select a driver for Windows 10 and adjust the architecture version to your computer (32-bit or 64-bit).

Then download the driver in zip format, then install it on your computer.

Repeat the above steps until all drivers are installed correctly. You can check one by one in the Device Manager to make sure all devices are working properly, this will be very useful for speeding up Windows 10.

If the method above doesn't work to find a suitable driver for a certain device then you need to look for it on the official site. Some devices may have closed source drivers or programs that are not available to the public, you can also check if the box has a driver CD that can be used.

That's the way to find and install unknown drivers that match the hardware in Windows 10. Hope this helps, if you still find problems, please comment below.

Read more »
How to Share a Printer in Microsoft Windows 10

How to Share a Printer in Microsoft Windows 10

To use the printer together, we can take advantage of the printer sharing feature in Windows 10.When working in an office or a room that uses the same network, either LAN or Wi-Fi, all computers in that place can use a printer connected to it. network without having to use cables.

Sharing the printer over the network will be more practical and effective because the job of printing documents becomes easier. You can print documents directly from the computer or laptop that you are using without having to plug the USB cable into the printer.

If in a room there are several computers that are used by different people, then each of these computers can use a printer together. The condition is that both the computer and printer must be connected to the same network, either via a LAN cable or Wi-Fi.

On this occasion, Winpreso will provide a step-by-step tutorial on how to share printers in Windows 10. You can practice it yourself in the office or at home where you work.

How to share printers in Windows 10 via a wired LAN and Wi-Fi network

1. Turn on Network Discovery and File and Printer Sharing

The first step that must be done is to turn on the Network Discovery feature, this feature functions so that computers can be found and connected to other computers or devices on a network.

Second, also activate the File and Printer Sharing feature to share the printer that we use with other computers connected in the same network.

You do this by going to the Control Panel> select Network and Sharing Center> select Change advanced sharing settings> check Turn on network discovery> check Turn on file and printer sharing> Save changes


2. Share the printer on the server computer

On the server computer (the computer that is sharing the printer) open Control Panel> Devices and Printers> Right click on the printer you want to share> select Printer Properties.

Notice in the Properties window, click on the Sharing tab> click the Change Sharing Options button> check Share this printer> name it as you wish> click OK.

Also check the option Render print jobs on client computers.


You can name the shared printer with a free name, but it's better if you give the printer type name or location or other description to make it easier to identify which printer to use.

3. Add a printer on the client computer

The next step is to add a printer that is already shared on the client computer. After you have done the two steps above, the printer should be network ready and ready to be used by other computers.

To add a new printer, go to Control Panel> Devices and Printers> Add printer.


Windows will scan, after which a list of printers on the network will appear ready for use.

Click on the printer that will be used and then click the Next button.


4. Print the document. Print a test page

After pressing the Next button in the above step you only need to wait a moment for the computer and printer to connect successfully.

If successful, a new window will appear with a button to print the document to test whether the printer is functioning properly.

Click on the Print a test page button and see if the printer can start printing the document. If you have click the Finish button.


5. The printer has successfully connected to the computer via LAN and Wi-Fi

Done, until here we have succeeded in sharing the printer on Windows 10.

Then you just need to replace the printer that is used when printing documents in applications such as word, excel, pdf, and others with this printer. The printer will appear with the name you gave it.

How to connect a printer via network in Windows 10

To add a new printer that has been shared from the network in Windows 10, there are other ways you can use it. The condition is that the printer must be in a "shared" state, meaning that it is ready to be used by other computers connected to the network.

Follow these steps:

  1. Click the Windows button
  2. Type "printer"
  3. Select the Printers and Scanners menu
  4. Click on the Add a printer or scanner button
  5. Wait for the list of printers sharing on the network to appear
  6. Click the printer that you want to use
  7. Click Next
  8. Follow the steps to Finish


How to connect a printer via IP Address in Windows 10

We can also use the IP address to connect the printer via LAN and Wi-Fi networks in Windows 10.

The trick is to access the shared directory on the server computer using the IP address and then connect the shared printer from there.

Follow these steps to share the printer via IP Address:
  1. First, know how many IP addresses of computers that share the printer (server)
  2. Press Windows key + R on your keyboard, then type the IP address of the server computer.
  3. Click the OK button
  4. We will enter the Shared directory window (it looks like windows explorer)
  5. Find the name of the printer sharing there
  6. Right click on the printer
  7. Select Connect
  8. The install process will begin, wait for it to finish
  9. Printer is ready to use
  10. Do a test print document to make sure the printer is functioning properly

Resolve undetected printer and print job jams

When sharing a printer in Windows 10, there may be problems such as a printer that is not detected or does not appear so that it cannot be connected.

To fix this, make sure you have enabled the Network discovery and File and printer sharing features as described in the steps above.

Next is to make sure that the computer and printer must be connected to the same network, either using a LAN cable or Wi-Fi.

The second problem is printer jam. When printing documents through the printer sharing feature in Windows 10, you may experience printer problems that cannot print.

Usually an error message will appear such as print jobs cannot be sent or others. This problem occurs quite often and to solve it is not difficult.

How to solve a print job jam in Windows 10:
  1. Open the Control Panel
  2. Select Devices and Printers
  3. Double-click the printer with problems
  4. Press CTRL + A button to select all existing print jobs
  5. Select Cancel all document or press the delete key on the keyboard
  6. Close all windows
  7. Try printing the document again
After doing the steps above, the printer should return to normal. Just try a test to print a document and see if the printer is good again.

This is the tutorial on how to share printers in Windows 10 via LAN or Wi-Fi networks and some solutions to solve problems that often occur. Hope you can help.

Read more »
Tips howto close program "not responding"

Tips howto close program "not responding"


1. Right-click on the desktop and select New -> Shortcut

2. Enter the following article in the box: taskkill.exe / f / fi "status eq not responding" [the quotes] and then click Next.

3. After that there will be a new shortcut with the name taskkill

4. Double-click the shortcut for each program having Not Responding then the computer will automatically identify and shut down the program.

Read more »
CWSM: Windows 7 Classic Start Menu

CWSM: Windows 7 Classic Start Menu


CWSM is short of Classic Windows Start Menu. The CWSM is start menu replacement program that replace the default start menu in windows 7 with start windows classic menu. Since windows vista version, Microsoft has removed classic start menu feature from their windows OS. But with Classic Windows Start Menu you can deliver classic start menu to windows 7 easily.


Classic Windows Start Menu (CWSM) is portable program so you can use and run the software without install them in your computer and this software available for windows 7 32bit and 64 version. If you have bored with windows 7 default start menu I think this software is better choice to change the start menu in your desktop.


Windows Classic Start Menu Features:
  • Deliver classic start menu to windows 7 like classic start menu in windows XP
  • You can customize the start menu by changing the background, icon size, cursor style, delay and more
  • Support for both windows 7 32 bit and 64 bit. I thinks this software also support for windows vista
  • You can change the Hibernate, Standby, Shutdown, Restart and Log Off icon with your own icon
  • It absolutely free
Download it and bring windows classic start menu to your windows 7. You can download the Windows Classic Start Menu (WCSM) from this link: Download Classic Win Start Menu

Source: tricks-collections.com

Read more »
Little action to make your computer run faster

Little action to make your computer run faster


There may be two reasons why your PC is running slow.
1. You havn't cleant up your PC for a long time.
2. You have got a virus or spyware on your PC.

I suggest you to run a virus test firstly with your virus scanner:(if you don't have virus killer, you may try Bitdefender, it is the best: 
1. Firstly, update your virus scanner database
2. Then run the scanner and check whether you have virus on your PC. When you find viruses, Kill them!
3.Then Restart your Computer.

Now you'll find your PC is faster than before, 
If not.
You may definetly need to clean up your PC.
Here is instructions about how to clean your PC: http://www.wikihow.com/Clean-Your-Comput…
1. Download a nice PC cleaner from http://www.pc-registry-repair.cc
(System cleaner is a best choice)
2. Run the cleaner and clean up your PC.
3. Restart your PC

Read more »
Howto Configure TCP/IP from the Command Prompt

Howto Configure TCP/IP from the Command Prompt


 In order to configure TCP/IP settings such as the IP address, Subnet Mask, Default Gateway, DNS and WINS addresses and many other options you can use Netsh.exe.

Netsh.exe is a command-line scripting utility that allows you to, either locally or remotely, display or modify the network configuration of a computer that is currently running. Netsh.exe also provides a scripting feature that allows you to run a group of commands in batch mode against a specified computer. Netsh.exe can also save a configuration script in a text file for archival purposes or to help you configure other servers.

Netsh.exe is available on Windows 2000, Windows XP and Windows Server 2003.

You can use the Netsh.exe tool to perform the following tasks:

  • Configure interfaces
  • Configure routing protocols
  • Configure filters
  • Configure routes
  • Configure remote access behavior for Windows-based remote access routers that are running the Routing and Remote Access Server (RRAS) Service

Display the configuration of a currently running router on any computer
Use the scripting feature to run a collection of commands in batch mode against a specified router.
What can we do with Netsh.exe?

With Netsh.exe you can easily view your TCP/IP settings. Type the following command in a Command Prompt window (CMD.EXE):


 netsh interface ip show config                                                 


With Netsh.exe, you can easily configure your computer's IP address and other TCP/IP related settings. For example:

The following command configures the interface named Local Area Connection with the static IP address 192.168.0.100, the subnet mask of 255.255.255.0, and a default gateway of 192.168.0.1:

 netsh interface ip set address name="Local Area Connection" static 192.168.0.100 255.255.255.0 192.168.0.1 1

(The above line is one long line, copy paste it as one line)

Netsh.exe can be also useful in certain scenarios such as when you have a portable computer that needs to be relocated between 2 or more office locations, while still maintaining a specific and static IP address configuration. With Netsh.exe, you can easily save and restore the appropriate network configuration.
Read more »
Cleaned amvo.exe virus manually

Cleaned amvo.exe virus manually


Today I got one virus in my system. When I try to login to the Yahoo messenger, it is closing without logging in. I have found a virus (don't know name) and cleaned it manually. I have taken the below steps to remove this virus manually.

  • First I have checked in task manager, I didn't find any suspicious processes.
  • Next I opened MSConfig (Go to run, and type msconfig). I have found one process with the name amvo.exe under the startup tab. It is located in Windows\System32 folder.
  • I unchecked the process, and closed the msconfig window.
  • Next I open Registry Editor (go to run, and type regedit). I have searched for "amvo.exe" and found one entry. I have deleted the whole key.
  • Next I have tried to set the option to "show hidden files" (Go to Tools> View in windows explorer), as virus file is hidden.
  • Then I have browsed to Windows\System32 folder, and deleted amvo.exe, amvo0.dll, amvo1.dll.
  • This virus put an Autorun.inf file, and .cmd file in every drive's root. I have removed all those.
Thats it. Virus was cleaned. Now, I am able to use my messenger. Don't forget to disable system restore before starting the cleaning process, and open windows in safe mode. Update: I built two files to clean this virus automatically. After downloading the AMVO Cleaner, unzip the file to get a folder. Open that folder, and double click on the file named AMVO_Delete. It should have cleaned the virus.
Read more »
Run a program in one touch!

Run a program in one touch!


Usually you need to click [Start] > [All Programs] > [Microsoft Office] > [Microsoft Office Word 2007] to run Microsoft Word. With this small trick you can start several program faster (not just Microsoft Word) in one keyboard touch!

1. Click [Start] > [All Programs] > [Microsoft Office] and then right click Microsoft Word shortcut.
2. Pop-up menu shows up, click properties.
3. On Shortcut key row, push button you want (F8 for an example).
4. Click OK to save the changes.

You can use this trick in many other application using different button. You cannot use one same button for several different applications. Good Luck!
Read more »