10 Effective Strategies to Boost Your Pinterest Traffic

10 Effective Strategies to Boost Your Pinterest Traffic


Optimizing your Pinterest to boost traffic involves several key strategies. Here’s a step-by-step guide to help you enhance your Pinterest presence and drive more traffic:

1. Optimize Your Profile

  • Complete Your Profile: Ensure your profile is complete with a clear profile picture, a descriptive bio, and a link to your website.
  • Use Keywords: Incorporate relevant keywords in your profile description to improve search visibility.

2. Create High-Quality Pins

  • Use High-Resolution Images: Ensure your pins are visually appealing and high quality.
  • Design for Pinterest: Use the recommended pin size (1000 x 1500 pixels) and create vertical pins, as they perform better.
  • Compelling Titles and Descriptions: Write engaging titles and descriptions for your pins, including relevant keywords.
  • Add Text Overlays: Use text overlays on your images to make the message clear and attract more clicks.

3. Pin Consistently

  • Regular Pinning: Pin consistently throughout the day rather than all at once. Aim for at least 10-15 pins per day.
  • Use a Scheduling Tool: Tools like Tailwind can help you schedule pins at optimal times for better engagement.

4. Optimize Your Boards

  • Create Relevant Boards: Organize your content into relevant boards with clear, keyword-rich titles.
  • Board Descriptions: Write detailed descriptions for each board, including keywords to improve searchability.
  • Arrange Boards: Display your most important boards at the top of your profile.

5. Engage with Your Audience

  • Interact with Followers: Respond to comments and engage with your followers to build a community.
  • Repin Quality Content: Repin content from other users that aligns with your niche to keep your boards active and interesting.

6. Use Rich Pins

  • Enable Rich Pins: Rich pins provide extra information directly on the pin, improving engagement. There are different types of rich pins (product, recipe, article) that you can use based on your content.

7. Join Group Boards

  • Find Relevant Group Boards: Joining group boards can help you reach a broader audience. Look for active boards in your niche.
  • Contribute Regularly: Contribute valuable content to group boards to increase your visibility.

8. Leverage Pinterest SEO

  • Keyword Research: Use Pinterest’s search bar to find popular keywords and incorporate them into your pin titles, descriptions, and boards.
  • Hashtags: Use relevant hashtags in your pin descriptions to improve discoverability.

9. Monitor Analytics

  • Track Performance: Use Pinterest Analytics to monitor the performance of your pins and boards. Identify what works and refine your strategy accordingly.
  • Adjust Strategies: Based on analytics, adjust your content strategy to focus on what resonates most with your audience.

10. Promote Pins

  • Use Pinterest Ads: Consider using Pinterest Ads to promote your pins to a larger audience. Target specific demographics to increase traffic effectively.

By implementing these strategies, you can optimize your Pinterest profile, create engaging content, and boost your traffic significantly. Consistency, high-quality visuals, and effective use of keywords are crucial to your success on Pinterest.

Read more »
How to reset Windows 10 without reinstalling and losing data

How to reset Windows 10 without reinstalling and losing data

Reinstall is a word that we often hear when a PC or laptop has an error and cannot find a solution to fix it. The only way left is to reinstall, but this also means that applications and data will be lost.


Is there any other solution besides reinstalling and deleting data? Of course there is, we can reset Windows 10 without reinstalling it. The data on Drive C will not be lost, but the application still has to be installed again after Windows has been reset.


Please follow the steps below.


How to reset Windows 10


1. Enter the Settings menu


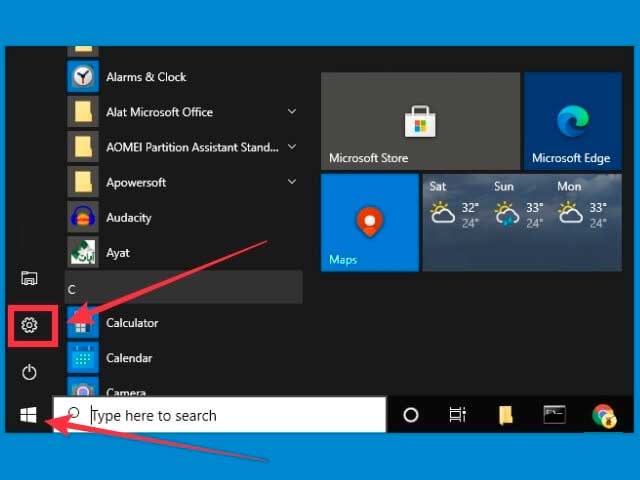
The first step is to open your Windows 10 Settings menu, how to click the Start button then click on the gear icon (Settings).


Figure 01 how to reset Windows 10 without reinstalling and removing data


2. Select the Update & Security menu


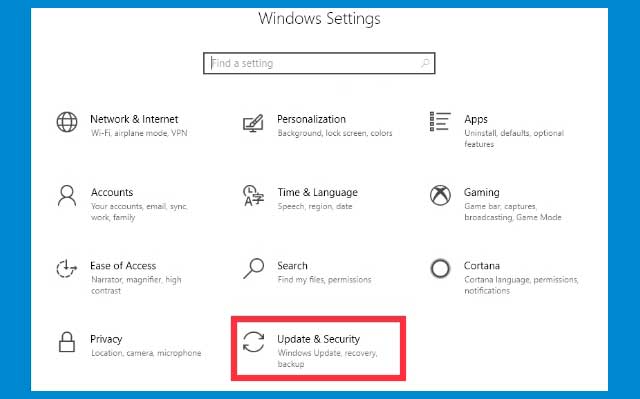
After entering the Settings menu, click on the Update & Security menu at the bottom.


Figure 2 how to reset Windows 10 without reinstalling and removing data


3. Select the Recovery menu


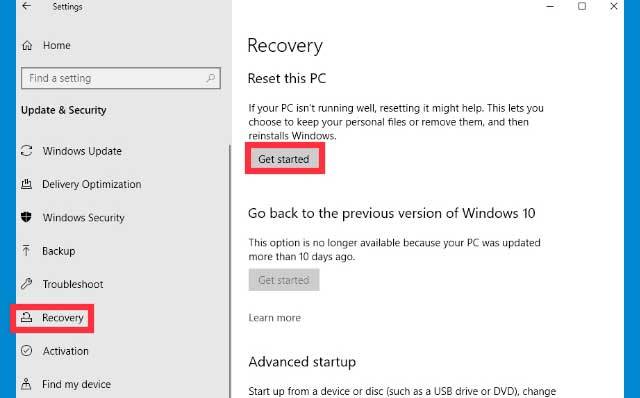
Note on the left tab panel, then click on the Recovery menu.


4. Click the Get started button


On the right panel, you will be presented with three options, namely Reset this PC, Go back to an earlier build, and Advanced startup. To do a reset, click the Get started button in the Reset this PC section.


Figure 3 how to reset Windows 10 without reinstalling and removing data


5. Select Keep my files


A new window will appear and you will be given two choices. First, Keep my files, this option will reset the PC, but the data in the Download, Music, Video, Document, and other data on drive C will not be lost.


The second option is Remove everything, if you choose this then all data will be deleted just like the first time you installed Windows 10.


Select by clicking one time the option Keep my files so that your data is not lost.


Figure 4 how to reset Windows 10 without reinstalling and removing data


6. Click Next


Then click the Next button.


7. Click the Reset button


A reset window will appear with the information Ready to reset this PC, at the bottom there is a Reset button, click on the button.


Figure 5 how to reset Windows 10 without reinstalling and removing data


8. Wait until the reset process is complete


Windows will restart and the reset process automatically, you just have to wait for it to finish.


9. Click the Continue button


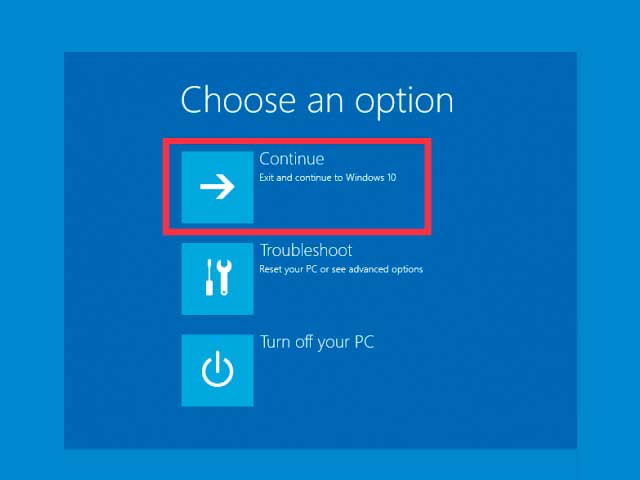
After the reset is complete, a window will appear to enter Windows 10, the Troubleshoot menu, and turn off the PC. Click on the Continue button to enter Windows 10 again.


Figure 6 how to reset Windows 10 without reinstalling and removing data


10. Reinstall the required applications


At this point, you have successfully reset Windows 10, the final step is to reinstall the applications you need.


How to reset Windows 10 via the Sign in menu


In some cases, your Windows 10 may have a problem so you can't access the Settings menu. This can happen because a virus from the flash enters the computer, or because there is a corrupt system file.


To reset you can use other methods, namely by entering via the Sign in menu or Login screen.


The steps:


Press Windows key + L on the keyboard, you will be taken to the Login page.


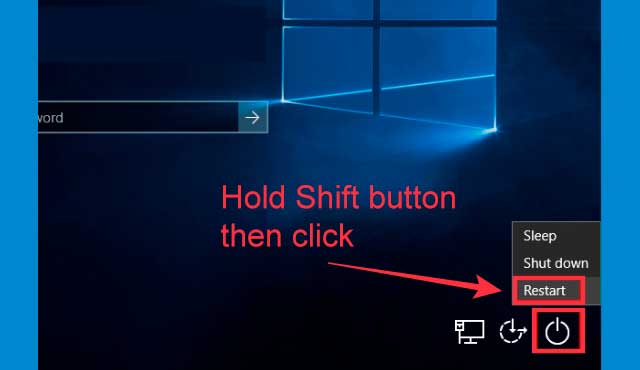
Notice at the bottom right of the screen, there is a power button. Hold down the Shift key on the keyboard then click the Power button> select Restart.


Figure 9 how to reset Windows 10 without reinstalling and removing data


Windows 10 will restart and enter the Windows Recovery Environment (WinRE) menu.


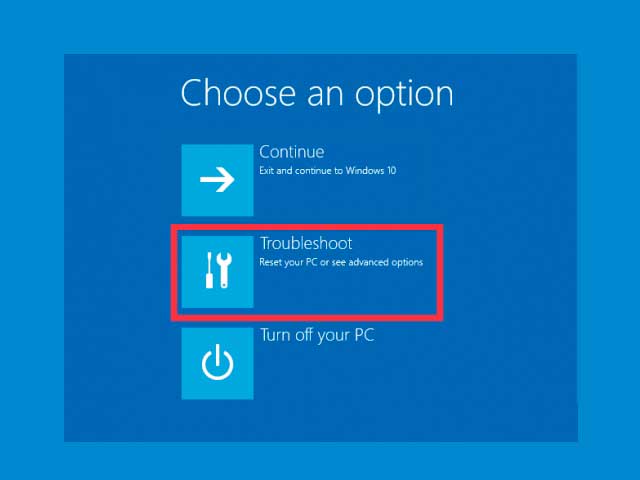
Then the Choose an option window will appear, click on the Troubleshoot option.


Figure 7 how to reset Windows 10 without reinstalling and removing data


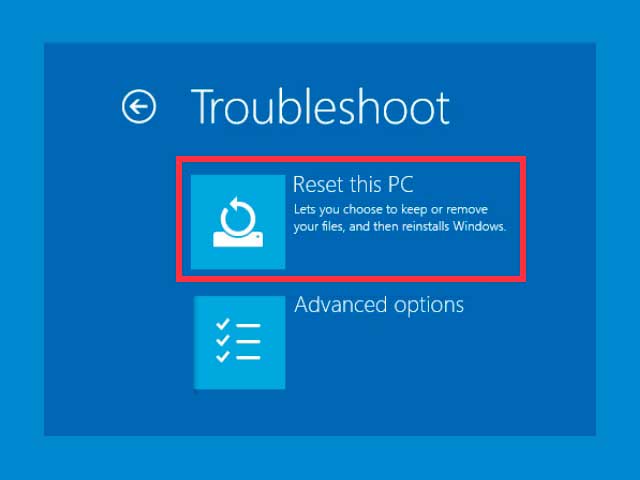
Then select Reset this PC.


Figure 8 how to reset Windows 10 without reinstalling and removing data


The rest of the steps are the same as the ones described above.


By resetting the error you may experience will disappear, this method is powerful enough without the need to delete existing data.


How to reset Windows 10 if you can't get to the desktop


If the problem with your Windows 10 is severe enough, it could be preventing it from logging on to the desktop. It could be because of a blue screen, a blank black screen, the loading process stops at the Windows logo, and other similar problems.


If you've created a restore point before, you can use it to restore Windows 10 to the state it was in before the problem occurred. But if it's not there, then resetting the PC can be a solution.


But because you can't enter the desktop, this also causes us not to be able to access the reset menu.


The fix is ​​to take advantage of the WinRE feature, from here we can reset Windows 10. But the first thing to do is to go to the WinRE page first.


First enter the Windows Recovery Environment or WinRE by doing the following steps:


  1. Turn on the computer then press and hold the power button for 5-10 seconds to turn off the computer.
  2. Press the power button again to turn on the computer.
  3. After the computer turns on, press the power button again and hold it for 5-10 seconds until the computer turns off.
  4. Press the power button again to turn on the computer.
  5. After the computer starts, press the power button again and hold it for 5-10 seconds to turn off the computer.
  6. Press the power button again to turn on the computer.
  7. Wait for Windows to enter the WinRE page


After the WinRE page appears, select it on the Troubleshoot menu.


Figure 7 how to reset Windows 10 without reinstalling and removing data


Then select Reset this PC.


Figure 8 how to reset Windows 10 without reinstalling and removing data


Follow the same steps as described above until the reset process is complete.


Read more »
Fix api-ms-win-crt-runtime-l1-1-0.dll is missing

Fix api-ms-win-crt-runtime-l1-1-0.dll is missing

When we run and install certain applications or games an error reads "The program can't start because api-ms-win-crt-runtime-l1-1-0.dll is missing from your computer. Try reinstalling the program to fix this problem ” it might arise.


This problem can happen to users of Windows 7, Windows 8, and Windows 10. What is the cause and how to solve it?


The cause of the api-ms-win-crt-runtime-l1-1-0.dll error is missing


The cause of this error appears is the loss of a file called api-ms-win-crt-runtime-l1-1-0.dll because it is deleted or the file is damaged. The location of the api-ms-win-crt-runtime-l1-1-0.dll file is in the Microsoft Visual C ++ Redistributable for Visual Studio 2015 program.


So every time you run an application or game that requires Microsoft Visual C ++ Redistributable for Visual Studio 2015 to run, this error will appear because the api-ms-win-crt-runtime-l1-1-0.dll file is not found or not function.


For example, when playing GTA 5 or PES 2013 games, this error often appears because without realizing it, the api-ms-win-crt-runtime-l1-1-0.dll file is damaged or no longer works on our computers.


To overcome this, the main idea is to repair the damaged file or replace it with a new one. Below are some of the ways you can try to do this.


How to solve api-ms-win-crt-runtime-l1-1-0.dll is missing from your computer


1. Update Windows

The Visual C ++ Redistributable for Visual Studio 2015 program is part of an updated version of Windows. So to fix it automatically, we just need to update Windows.


Windows 10:


  1. Click on the Start button
  2. Select Settings
  3. Select the Update & Security menu
  4. Click on the Windows Updates tab
  5. Click on the Check for updates button
  6. Wait until the download and install process is complete
  7. Restart your computer


Windows 8:


  1. Hover over the right corner of the screen to access the Charm bar
  2. Click on the Settings menu
  3. Click again on the Change PC Settings menu
  4. Select the Update & Recovery menu
  5. Select the Windows Update option
  6. Click on the Check now button
  7. Wait for the download and install process to complete
  8. Finally restart your computer


Windows 7:


  1. Click the Start button
  2. Select the All Programs menu
  3. Click on the Windows Update option
  4. Click on the Install Updates button
  5. Wait until the download and install process is complete
  6. Finally restart your computer


After performing the steps above and the computer is back on, try again to run the problematic application or game again and see if the api-ms-win-crt-runtime-l1-1-0.dll is missing error has been successfully resolved .


2. Download the Visual C ++ Redistributable directly from the Microsoft website


If the first method hasn't worked or for some reason you can't update Windows, then the next solution is to download the C ++ Redistributable program directly from the Microsoft website.


The idea is to reinstall the program so that the damaged or missing api-ms-win-crt-runtime-l1-1-0.dll file can be replaced with a new one. This method is more likely to work than just updating.


Follow these steps:


  1. Make sure your laptop or PC is connected to the internet
  2. Open a browser application
  3. Go to the following Microsoft web page: Download
  4. Click the Download button


    overcoming api ms win crt runtime l1 1 0.dll is missing 1

  5. Select the appropriate Windows architecture according to whether you are using 32-bit or 64-bit
  6. Click the Next button
  7. Wait until the download is complete
  8. After the file has finished downloading, double click to install it
  9. After the install process is complete restart your computer


After the computer turns back on, try again running the application or game that couldn't and see if the error "The program can't start because api-ms-win-crt-runtime-l1-1-0.dll is missing from your computer. Try reinstalling the program to fix this problem ”still appears or has been successfully resolved.


3. Perform Repair and Repair the Visual C ++ Redistributable via the Control Panel


The next solution that you can try to do is to repair the Visual C ++ Redistributable program. On the Windows operating system, there is a Repair feature that we can use to do this. Although this method is not always 100% successful, it is worth trying.


Follow these steps:


  1. Click on the Start button
  2. Type Control Panel
  3. Select the Control Panel program that appears
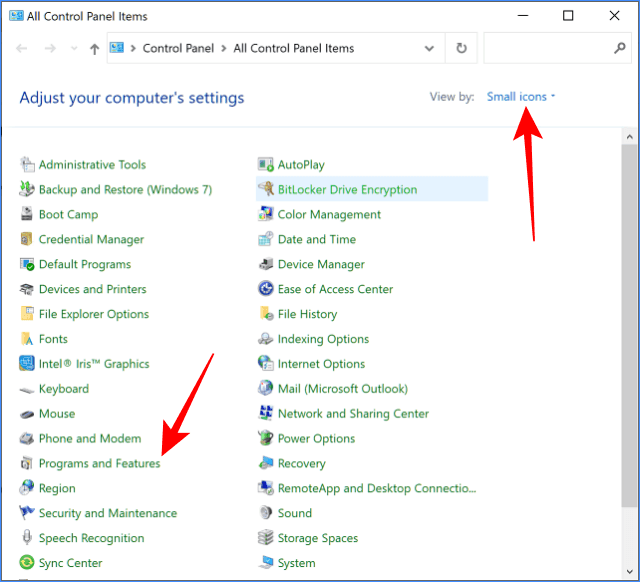
  4. In Control Panel select View by Small icons mode
  5. Then select the Programs and Features menu

    overcoming api ms win crt runtime l1 1 0.dll is missing 2

  6. Right click on the program called Microsoft Visual C ++ 2015 Redistributable
  7. Select Change

    solve api ms win crt runtime l1 1 0.dll is missing 3

  8. Click the Repair button then select Yes

    overcoming api ms win crt runtime l1 1 0.dll is missing 4

  9. Follow the next instructions to complete
  10. Finally, after the repair process is complete, restart your laptop or PC


4. Download the api-ms-win-crt-runtime-l1-1-0.dll file from the internet


The next solution to solve the api-ms-win-crt-runtime-l1-1-0.dll is missing problem is to replace the file with a new file obtained from the internet. There are several dll file database sites that we can use, we just have to find these files to replace the old files.


Follow these steps:


  1. Make sure your PC or laptop is connected to the internet
  2. Open a browser application
  3. Go to the following page: Download
  4.  On this page you will see several versions of the api-ms-win-crt-runtime-l1-1-0.dll file for both 32-bit and 64-bit architectures
  5. Choose the appropriate Windows you are using and then download the file to your computer
  6. The file is still in Zip form, so it must be extracted first with an archive application such as 7zip or Winrar
  7. Next we have to move the resulting file to the location where the api-ms-win-crt-runtime-l1-1-0.dll file is located in C / Windows / system32. Copy and paste the file to that location, if there are questions to overwrite or replace, select Yes.
  8. Restart the computer

5. Run the System Restore Point


Restore Piont is a system backup method that can be used when there are errors that are difficult to fix, including api-ms-win-crt-runtime-l1-1-0.dll is missing from your computer.

To be able to use this feature, you must have previously created a Restore Point, if you haven't, then skip this method.

Follow these steps:

  1. First enter the Control Panel then select the Recovery menu
  2. Then click on Open system Restore then click Next
  3. The System Restore window will open, where you will see a list of Restore Points that have been created
  4. If there are more than one Restore Points, pay attention to the date, select the one with the most recent date
  5. After that, click the Next button

    overcoming api ms win crt runtime l1 1 0.dll is missing 5

  6. Finally click the Finish button

6. Reset the PC


If all of the methods above have been tried but nothing has worked, then the last solution left without having to reinstall is to reset the PC.

This means we will restore Windows to factory settings, such as when you reinstalled or bought a laptop.

Resetting is different from reinstalling because you will be given the option to keep personal data in the user folder from being lost.

Follow the steps in this tutorial to reset your computer:

Read more »
How to Backup Microsoft Office License and Restore It

How to Backup Microsoft Office License and Restore It

When you are about to re-install or reset your PC, one of the things you take into consideration is whether the existing Microsoft Office license can still be returned later.


As you already know, after we reinstall or reset all existing applications will be deleted, including Microsoft Office and other original applications.


Therefore, it is better if we have to back up the Microsoft Office license beforehand so that it can be returned easily later. Likewise, if you intend to move Microsoft Office applications from one laptop or PC to another, you must first do a backup.


How to Backup Microsoft Office License

1. Open the File Explorer application

The first step is to open the File Explorer application on your PC or laptop as usual.


2. Enter the directory C: \ Windows \ System32

Then enter the following directory C: \ Windows \ System32


You can do this by copying and pasting the address into the File Explorer address bar or you can also go through the RUN menu. The trick is to press the Windows key + R then copy and paste C: \ Windows \ System32 into the box then click OK.


3. Find the folder named spp

Inside the System32 directory you will find many folders containing system files. The next step is to find a folder called spp.


how to backup Microsoft Office license 2


4. Copy the spp folder

Then you copy the SPP folder as usual.


how to backup Microsoft Office license 2


5. Move to another safe place

Paste the spp folder that you copied earlier to another location that will not be deleted when you reset or reinstall it. You can save it on drive D, external hard disk, or even on a flash.


Done, until here we have succeeded in backing up the Microsoft Office license. Next is to return it or move it to another laptop. Follow the tutorial below.


How to restore Microsoft Office license or move it to another computer

1. Install Microsoft Office with the appropriate version

The first step is to install the Microsoft Office application with the appropriate version. Can be downloaded directly from the official Microsoft site. Make sure the version you download is the same as the license that was backed up, whether it's Microsoft Office 2007, 2010, 2013, 2016, or Office 365.


2. Open the Command Prompt (CMD) program

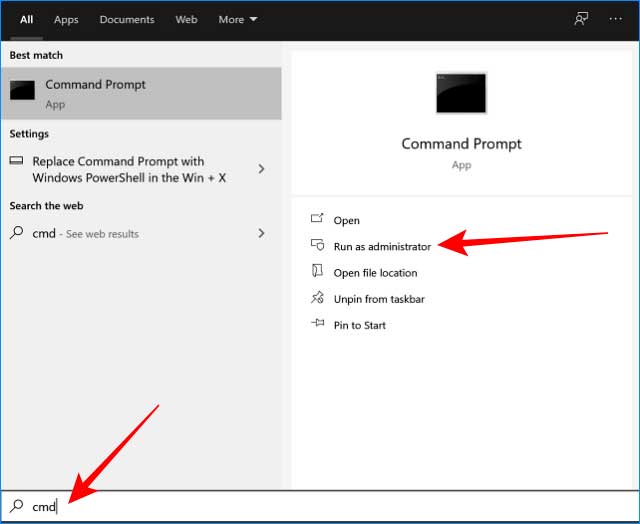
Then open the Command Prompt program with administrator access. The trick is to click on the Start button> type cmd> on the menu that appears select Run as administrator.


how to backup Microsoft Office license 3


3. Stop the service called Software Protection Platform with CMD

In order to restore the Microsoft Office license to the laptop, we must stop the service process called Software Protection Platform. This can be done with CMD.


At CMD enter the following command:


net stop sppsvc


Then press Enter.


how to backup Microsoft Office license 4


4. Copy the spp folder to the C: \ Windows \ System32 directory

After the process is stopped, now you can return the Microsoft Office license to your laptop. You do this by copy and paste the spp folder that you backed up earlier. Copy the folder to the C: \ Windows \ System32 directory.


5. Run the Software Protection Platform service with CMD

After the Microsoft Office license folder has been returned, finally we have to run the Software Protection Platform service again.


Return to CMD then type the following command:


net start sppsvc

Press Enter.


how to backup Microsoft Office license 5


Done. Now try running your Microsoft Office application and see if the license has been restored successfully?

Read more »
How to Search for words within files on Windows 10

How to Search for words within files on Windows 10

Searching for a particular document containing certain words or phrases by scanning through each file yourself, can be both time consuming and frustrating. Why not save yourself some time by using the search function in Explorer. To search for words within files on Windows 10 follow these instructions:

  1. Open windows explorer
  2. Using the left hand file menu select the folder to search in
  3. Find the search box in the top right hand corner of the explorer window


  4.  In the search box type content: followed by the word or phrase you are searching for.(eg content:yourword)


  5.  To narrow down the search it is best to include a file type (eg .doc, .xls). To do this, add the word file: followed by the file type. (eg file:*.doc)


  6. This will bring up all word documents within that folder that have the word or phrase you are looking for. From here you may select the document that you wish to open.

Read more »
Here are 5 reasons OxygenOS is the best Android version

Here are 5 reasons OxygenOS is the best Android version


Here are 5 reasons OxygenOS is the best version of Android, with its smooth performance and OxygenOS streamline optimizations for outstanding smoothness and responsiveness.


Not only is this version fast and smooth, every aspect of OxygenOS has been meticulously refined for an incredibly smooth experience. Innovative features and optimizations make things faster, smoother and more inspiring.


Unlock screen and live wallpaper, fresh new features, OxygenOS in-display fingerprint enhancement makes unlocking your device smoother and smoother, while all new live wallpapers add a charming personal touch.


How much it makes variety is the spice of life, and while there are tons of third-party skins on Android that offer the same core experience, OxygenOS is one, if not, the best out there.


Having options for your smartphone's UI and experience is one of the core strengths and indeed a drawback of buying or using an Android smartphone or tablet on an everyday basis.


If all Android phones come with what most people refer to as a "stock" mobile OS, you have to admit that it will be an overall trite experience. And we get it, regular Android isn't for everyone.


Samsung has One UI, Oppo has Color OS, Huawei has EMUI, Xiaomi has MIUI, even Pixel has different versions or branches of Android. All offer their own core experiences and unique experiences, but, at least in recent years, we think the benchmark has become OxygenOS.


With that in mind, here are five reasons we think OxygenOS is arguably the best way to experience Android and could potentially be the default experience for first timers.


1. Light skin


While other OEMs will completely overhaul the look and feel of the core Android OS, OnePlus prefers to keep changes minimal. At first glance, the changes are only cosmetic when compared to the experience on the Pixel phone. This is the main reason why many "purists" find the OnePlus smartphone so attractive.


This means it feels “clean” compared to the over-the-top changes that the likes of Huawei, Samsung et al. It's understandable that some people like to have extra features, OxygenOS packs a lot, but it manages to do so without sacrificing the look and feel or pre-loading bloatware. You'll find a few extra usability features and apps, but nothing to hurt device performance or ruin your overall experience.


On the surface, it looks a bit plain, but the experience is far from it.


2. Improved accessibility features


OxygenOS adds a ton of neat little accessibility and access features to Android, some of which are not available anywhere else, but all of which are superbly executed. A good example is the Quick launch function or screen-off gestures. The latter allows you to draw on the lock screen to activate things like the camera or turn on the flashlight.


On top of that, OxygenOS includes the ability to take a screenshot by tripling your screen, raise it to answer a call, flip to mute a call, and much more on top. While hardware doesn't have to be part of the software experience in the same way, you also have dedicated buttons for logging in and out of silent, vibrate, and ring modes too. OnePlus has really thought about how easily certain features can be accessed, which is a big plus.


We haven't even managed other awesome extras like Power Down Scheduling, App Lock, and Parallel Apps. All of these give you extra control you may not find anywhere else and really reaffirm the power and flexibility of Android.


3. Speed


Part of this depends on the hardware, but in almost every case the inertia and speed with OxygenOS are light years ahead of all Android phones. Obviously, being fast doesn't necessarily mean that your software experience is the best, but it does help ensure that the OnePlus phone really feels sharp all over the place.


Apps load fast, scroll feels sharper and a lot more responsive. OnePlus improved the animations and gestures to really make it feel as if OxygenOS was the fastest version of Android. The introduction of the 90Hz refresh rate takes the stakes even further. OnePlus's “Fast and Smooth” ethos is what really sticks out.


4. Deeper device customization


Android 10 on Pixel provides the most in-depth set of customization options for "stock" OS builds. But OnePlus has offered better control options for a longer time, letting you activate a system-wide dark theme, plus accent and toggle color changes. This is the tip of the iceberg, as even system fonts can be changed between the two options, if you want.


The special customization section gives you more control than the basic Styles and wallpaper options on Pixel devices running Android 10 as well. Adding to that, you can add or remove status bar icons, change the battery indicator, and much more, all without the need to study developer settings.


OxygenOS gives you nearly all of the controls of a Nova-like launcher, but right out of the box.


5. OxygenOS Open Beta Program


You could argue that this is a little unfair, as many other manufacturers offer developer beta and preview programs. However, the OnePlus Beta program is one of the best, as it often gives you a taste of the features and functionality that will be coming long before its stable release. You also get regular security patches and nifty bug fixes too.


Unlike the Android Developer Preview program, the beta tends to be much more stable from day to day and is open to all OnePlus owners. If you just need to have the newest features, then this is a fantastic way to try things out in front of the crowd too.


Read more »
How to Fix a Paper Jam in a Printer

How to Fix a Paper Jam in a Printer

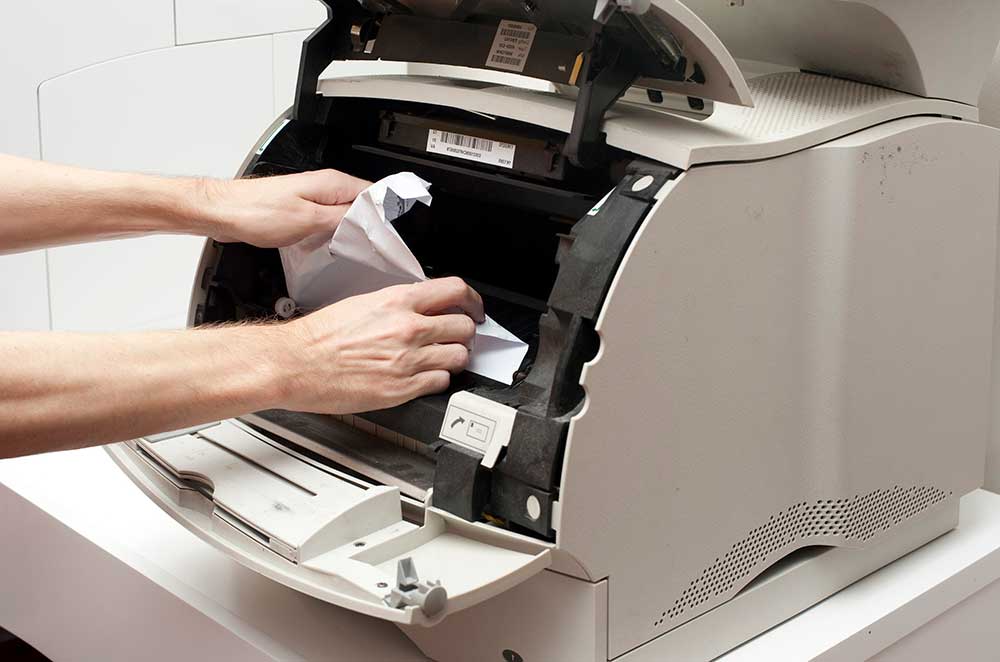
The wrong way when someone has a paper jam problem is to lift the front cover and pull the jammed paper from the printer.


Therefore, follow the instructions below to find and remove the jammed paper (paper jam) from the printer properly. Before starting, make sure to follow each step correctly and don't skip the steps provided because it can potentially damage your printer.


Step One: Removing Paper From Printer Paper Tray


  1. Remove all paper from the paper tray
  2. Press the resume button
    • If you were successful in clearing paper jams, skip to step 4 and make sure the carriage can move freely
    • If the paper is still jammed continue to the next step
  3. If more than one paper is jammed in the printer, remove the paper one at a time (remember through the printer paper tray). Hold the sheet in the middle of the pile with both hands and pull the sheet towards you. Usually, removing a sheet or two from the center of the pile takes the pressure off and can remove any paper jams.
  4. After my friend has removed all the paper, check again that there are no scraps of paper / pieces of paper stuck in the printer.
    • If you were successful in clearing paper jams, skip to step 4 and make sure the carriage can move freely
    • If the paper is still jammed continue to the next step

Step Two: Clearing Jams From Behind The Printer


If you have trouble reaching the jammed paper from the tray, follow these instructions to clear the paper from the back of the printer. The back of the printer has an access door or two-sided printing accessory known as a duplexer.


1. Remove the rear access door to clear the jam

  1. Turn the knob on the rear access door (counterclockwise direction)
  2. Let go of the door
  3. Pull out jammed paper
  4. Check that there are no pieces of paper stuck in the printer
  5. Reinstall the rear access door into the printer
  6. Turn the knob clockwise to lock it
  7. If you were successful in clearing paper jams, skip to step 4 and make sure the carriage can move freely
  8. If the paper is still jammed continue to the next step

2. Remove the double-sided printing accessory to clear the jam

  1. Simultaneously press the RELEASE button on each side of the module and remove the module
  2. Pull the jammed paper from the printer
  3. Check that there are no stuck pieces of paper
  4. Push the module back into the printer until it snaps into place (do not press the button on the end of the module while returning it
    • If you were successful in clearing paper jams, skip to step 4 and make sure the carriage can move freely
    • If the paper is still jammed continue to the next step
  5. Press the button above the double-sided printing accessory and open the door
  6. Pull the jammed paper from the module
  7. Check to make sure there are no pieces of paper stuck in the printer
  8. Close the duplexer door
    • If you were successful in clearing paper jams, skip to step 4 and make sure the carriage can move freely
    • If the paper is still jammed continue to the next step

Step Three: Lift The Front Cover And Slowly Remove The Jammed Paper


After trying all the options above, open the front cover and grasping the jammed paper, gently pull it out.


Gently pulling paper out from under the front cover is only a last resort. Pull paper from the back of the printer or into the input tray. Do not lift the front cover and pull the jammed paper out of the printer. Pulling paper quickly can increase the chance of damage to the printer.


Step Four: Ensure The Carriage Can Move Freely


  1. Unplug the power cord
  2. Check to make sure the carriage moves freely from one side of the printer to the other
    • If the carriage can move freely to the right and out of view, skip to stage five: Reload and test the printer. Do not force the carriage to move.
    • If the carriage does not move, continue with the following steps
  3. Remove the cartridge
  4. Gently move the cartridge to the right end of the printer
  5. Remove paper from the input tray, but do not remove the drawer
  6. Remove the double-sided printing accessory
  7. With your fingers, roll the roller up three full turns
  8. Slide the double-sided printing accessory or rear door access into the printer until it snaps into place.
  9. Reinstall the cartridge
  10. Plug the power cord into the printer
  11. Turn on the printer

Step Five: Reload And Test The Printer


After you manage to solve the jam or paper jam problem, make sure that the printer is still functioning properly. Do it

  1. Reload the printer with plain inkjet paper
  2. Self test printer 


Step Six: Servicing Your Printer


If you have done all the steps above correctly and in order, but this problem has not been resolved, you should service your printer.

Read more »
Home